Model merging is a powerful feature that allows large or complex models to be built in smaller segments. A model segment may be as small as a single workstation or as large as an entire department. After all segments are ready, they can be merged together to form a single model.
The Merge feature consists of two options: Merge Model and Merge Submodel.

The Merge Model option allows two or more independent (complete or incomplete) models to be merged into a single model. Duplicate elements found in the base model and the merging model are treated differently according to the element type.
Entity and attribute names common to both models are considered common elements in the merged model. For example, if both models contain the entity type In-Box, the merged model will contain only the record from the base model in the Entities table for In-Box.
Duplicate locations, resources or path networks must first be renamed or deleted from the merging model. Otherwise, an error message occurs and the merge will terminate.
If the two models use different graphic libraries,
All other duplicate model elements cause a prompt to appear with the choice to delete the duplicate element from the merging model or cancel the merge process.
The Merge Submodel option allows commonly used submodels to be merged into an existing model in one or more places. Submodels are created just like any other model and may be complete or incomplete models.
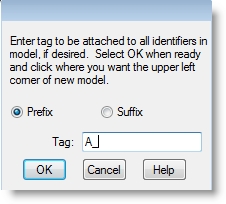
When specifying a submodel, you are prompted for a “tag” to be attached to each element of the submodel as either a prefix or suffix. For example, you may be developing a model with four workstations. Instead of creating workstations individually, you could create a submodel with only the common elements (e.g., in-box, out-box, telephone, variables, arrays, etc.) and merge the submodel into the main model four times. In the resulting model, you would then fill in the unique portions of each workstation. Entity and attribute names will not be tagged.
In the following example, the tag “A_” is attached as a prefix to every element of the submodel. A location called Queue1 in the submodel becomes A_Queue1 in the main model and so on. Likewise, a variable called Rejects becomes A_Rejects in the merged model.

Please Note: Tags used as prefixes must begin with a letter, A through Z, or an underscore. For example, the tag “3C_” is invalid and would produce an error message.
How to merge a model or submodel into an existing model:

Please Note: When merging models, if the zoom factors and grid scales are not the same,

|
© 2012 ProModel Corporation • 556 East Technology Avenue • Orem, UT 84097 • Support: 888-776-6633 • www.promodel.com |